


After the previous post We have already guided you on how to download Windows 10 ISO files directly from Microsoft's web site. Now it's time to install this new Windows Build. methods that we are familiar with It would be to make a bootable disc or USB for booting and plug it into the machine, press Restart or Windows Media Creation Tool that we normally download from Microsoft's website.
Today I'm going to introduce another geeky method for you to read, which is very useful. For those who want to reload But I don't have an empty Flash Drive/Thumbdrive at all, and it's perfect for reinstalling Windows with Windows Box (which looks like Android Box) and Chinese tablets (including Surface) that sometimes find a way to make it boot USB. Not quite at all, especially if it's a Chinese tablet, you need to find an OTG cable that is Micro USB to use separately.
Well, let's get started!
1) Backup data first.
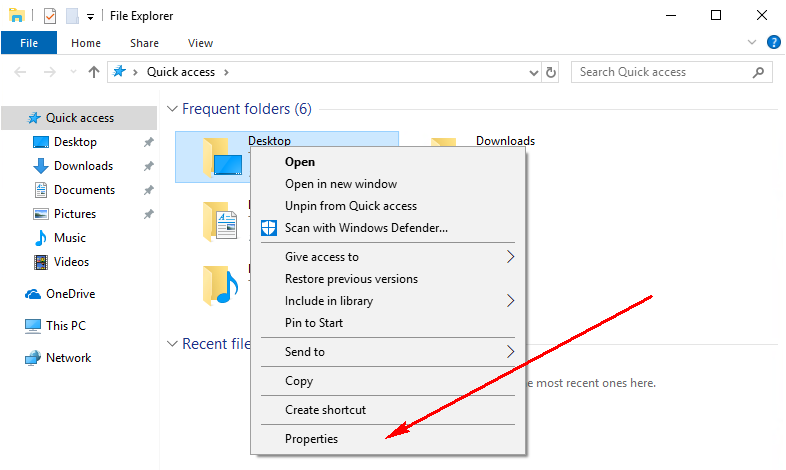
First of all, back up your data in C:\!
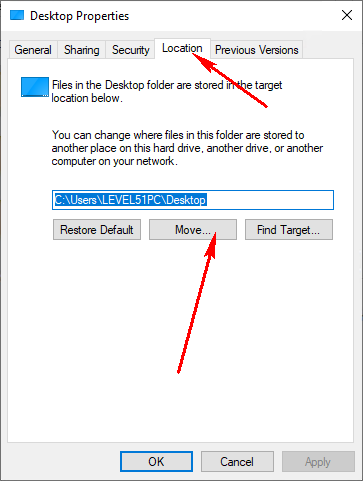
Don't forget that it will all disappear. Documents, Music, Desktop. If you haven't moved, it's time to Copy. If you want to move, right-click on those folders and press Move.
 |
 |
For those who don't have a second HDD backup, there is another way to Backup, which is to shrink Drive C down by right-clicking on the Start button, selecting Disk Management , and then using the Shrink command, which will shrink a lot depending on whether you use Drive C. No matter how much you go, maybe it won't shrink at all if there's a naughty program. to write data at the end of Drive if this is the case You can use the free version of Easeus Partition Master to shrink it down, then you can move it to a new drive again.
2) Remove the install.wim file.
as said This is the Geek way and we won't do USB Boot either. Once we have the ISO file, Double Click to let Windows simulate the ISO to Drive and copy the source\install.wim file. Come out and put it in a place that is easy to find, such as the outer end of D:\ something like this, but if you want it to go down quickly. It is recommended to put it in a Disk that is different from the one that will go down, such as having an SSD + HDD, copy it in the HDD, etc., or if there is a Flash Drive USB3.0, you can put it in there.
In addition, if the machine is plugged into a LAN cable and the house has a NAS box (or a machine that can share folders) can copy this file. You can put it in the NAS/Share Folder box too, in case there are many machines to use. so you don't have to copy it in many places But be careful that the NAS box must be updated. Because if it's a Share like SMBv1 (older Linux versions), Windows won't let it continue because SMBv1 is old. and has security vulnerabilities In the old days, our world was not this complicated~
Another important matter, down via LAN (Share Folder) can only be used with the machine that is a home Lan card (eg Realtek) that Windows sees without having to install Driver if they Killer Lan will be a bit complicated. But you can do the same, see section 3.5.

MORE FOR LEVEL51 MACHINE
If there is a USB Flash Drive/Thumbdrive formatted as NTFS and don't want to delete the data inside, you can copy all files in the ISO and place it in the Flash Drive. This one can be used to boot into Windows Setup without having to use a program to create it. USB Boot Drive like Rufus
3) Enter Recovery Mode
Press the Start button and type "Recovery" and follow the screen. (For machines that do not have a password set, they can press through without entering a password)
3.5) Enable Network to connect Share Folder
(If using files from USB Flash Drive/Thumbdrive You don't have to do this step.)
Now, if you want to use a file that is placed in a shared folder/NAS box, start using the command (When you say to use a command, press Enter after you finish typing.)
wpeinit
then use the command
net use n: \\192.168.1.234\Space
to connect to the NAS box, IP Address 192.168.1.234 or if you don't know can use its name
By this command will simulate Drive N: to link to a shared folder named Space . Its name has a space, put " " around it. For example, if you want to connect to Share at the name of Company Space , type
net use n: "\\192.168.1.234\Company Space"
As for if it's a strange Ethernet Controller, follow this to load the Driver (in summary, it means that you need to find a Driver that is not an Installer. There will be .cat, .inf, .sys files together. Unzip the zip. Out and put it in a place that is easy to find. and then use the drvload command followed by the .inf file name)
4) "Format" Drive C discarded.
The next step is that we will delete the data in Drive C to prepare to install Windows. We will use the following commands.
diskpart
This will open the Windows Partition Manager, then use the command
list volume
This will bring up a list of all the Drives (which is Partition, or rightly called Volume) that are now available.
Then we will have to type the command to select the desired Volume, by which we will choose the Volume that is the original Drive C, notice it should have a Label that Windows, if you are not sure, should go back to Windows to Rename it, then the data will be lost. Do not forget to observe carefully What number must it be?
select volume volume###
In the case that the volume that we will install Windows is not Drive C, if we force it down, we will get Drive Windows that is not C. The method is to select the volume # that is currently C and use the command
remove
to remove Drive Letter then select volume # you want to be Drive C and run the command
remove
again to remove its Drive Letter before running the command
assign letter=c
to set it to Drive C
Once you are sure that the volume is in the correct volume (use the command list volume to look again, the volume is selected. will have an asterisk * ), use the command
format fs=ntfs quick
to delete the information then use the command
exit
to exit Diskpart
5) Select the desired version of Windows.
For modern Windows installations (since Windows Vista), it's copying Windows files from an Image into it, similar to unzipping a zip, but it's a .wim file instead, and a .wim file is designed with De-Duplication makes install.wim a single file can store many Windows data editions, so we have to see first what edition of this .wim file is there and what is its number. Must see first every time Because it might not be the same when a new version of Windows comes out.
The way to view it is to use the command
dism /get-wiminfo /wimfile:N:\install.wim
where N:\install.wim is the address of the Wim file. However, when we are in Recovery Mode like this, the Drives may move. You have to compare the list disk in Diskpart to see what Drive it is. Let's say if we put the install.wim file in D:\Software\Windows. have to type
dism /get-wiminfo /wimfile:D:\Software\Windows\install.wim
5.5) Differences between each edition of Windows
Of course, that it came out 11 Edition, you would probably wonder if and which Edition would be a good choice, of course, you had to choose to match the key that you bought it from when it was posted. For those of you wondering how each edition is different, here's a summary.
- Home vs Pro , my hot question is that for general use, use Home unless you want to use special abilities. Which most people will rarely use these will have to use Pro are:
- Join Domain : If the company has Windows Server using Active Directory system, this one must use Pro only to be able to connect to Domain, otherwise we can connect to it, but may connect to Printer, Share Folder or Single Sign-On. nothing at all
- Using Docker for Windows or using Hyper-V : If you already have VMWare or are using VirtualBox, you don't need it, but Docker for Windows will need Hyper-V which is only available in Pro. If you want to use Docker with Windows. 10 Home can use Docker Toolbox (before Docker for Windows was used), but Docker Toolbox can't use Containers for Windows. Docker for Windows can choose whether to use Windows Container or to use Mobylinux as Container.
- Bitlocker Drive Encryption
- Want to connect to this machine using Windows Remote Desktop ? In other words, this machine is a Server Remote Desktop. In fact, we can use Moonlight (free), or TeamViewer or VNC . In Windows 10 Home there is a Remote Desktop Client . already
- Pro for Workstations will be a special edition that uses more RAM.
- With N vs Without N : For Windows N is a special version. That cuts out all Multimedia capabilities (can not open MP4 files yet), but can be installed later. Available separately on the Microsoft website. But using the N version will not be able to use Windows Mixed Reality, even if you install the Media Feature Pack later.
- K, KN is a special version for South Korea. We don't even need to use it.
- Enterprise is a higher version than Pro. Big companies will use this Windows because it has more control over Windows and can do Windows To Go and sell it as a big pack for the whole company.
- Education is an Enterprise version with a lot of control (lol!) suitable for use in schools. And students have the right to receive this free gift as well.
- Windows Server vs Normal Windows Some people try to use Windows Server on a daily basis, too. which I myself had to use because the work before Have to do about the server often. Use Windows Server, so it's easy. The main difference is that every part of the Windows Server is removable (even the desktop), making it more suitable as a server, and of course there will be parts for it to be a server that we can install on normal Windows. none but in terms of efficiency If it feels faster Probably because there are fewer parts. But there will be a lot of limitations. And then have to sit and set a lot. To be able to use normally, plus some Anti-Virus programs require a special license for Windows Server as well.
Can I choose yet? :D Of course, Home is enough, except I want to use Hyper-V .
6) Really install Windows
For the command used to install Windows is dism as follows.
dism /apply-image /imagefile:N:\install.wim /index:1 /applydir:c:\
where index:1 means we choose to install Windows 10 Home normally (For the files I have, 3 is Home Single Language and 6 is Pro) and N:\install.wim is install.wim file. We are in Drive N :.
When the Dism program is finished running You will need to use the bcdboot command to tell that Windows is also installed at C:\Windows as follows:
c:\windows\system32\bcdboot c:\windows
That's all.
7) Skip all Out-of-Box-Experience (OOBE) steps.
For those of you who use Windows often, encountering OOBE all the time can be very tedious. The method is that we will use a file called unattend.xml to help us answer questions in OOBE. You can download a sample file . that we can use with the LEVEL51 machine at all (Note: in the file will be run postinstall.exe This adds a few more settings, disabling Windows from downloading drivers, and setting the Registry to show file extensions. Along with opening the install link SystemX can download postinstall.exe here )
How to create this unattend file, read on Microsoft's website. and Microsoft There's also a program to create this file, it's in the ADK . Thousands of machines, how can he Deploy Windows into the machine one by one without having to sit and chase after each machine? He also used this method, along with other systems.
To use the unattend.xml file, just copy it into C:\ using the command
copy N:\unattend.xml c:\unattend.xml
Once everything is ready, use the exit command to boot into the Windows we just installed again, so if you're already using unattend.xml, you don't need to do anything else, just wait.
end
Oh, I'm going to write one Why did it come out this long again!!! Hope the information in this post is helpful. For those who like to install new devices often or IT department, including everyone who wants to install a new Windows, but does not have an empty Thumbdrive at all.
After you're done, don't forget to do these 5 things as well. To make the machine work well and it is easy to maintain.