


Elite Dangerous is another game that I hope one day to dig it up and play again. Plus, at the beginning of the year, when the Horizon sector was on sale, I went and kept it separately. It's another game that I spent more than 150 hours on it. It can be called my family's time because I play with my younger brother. Played all by myself, from learning to pilot until the very end, we have a probe-class ship that can almost jump across the galaxy. (And I've visited the Nebula once in a while. Totally 52 Jumps on the way and 50 Jumps on the way back. Jumping for a few days to get there.)
But if anyone ever opened this game up (There are free games too. It's a shooting craft) will know that this game is probably the game with the most buttons in the world, how many? Let's look at this screen >.<
I remember To the purchase of the Chatpad of the XBOX360 Joy (which is a very durable joystick, I have been using it for more than 10 years now. It's not broken yet) Let's add more. Before I found that it doesn't work on the computer, hehe, but he has fixed it. If the Xbox One controller has a Chatpad, it can press the button on the Chatpad instead of the keyboard.
But why would I have to pay money to buy a joystick, XBOX One, Receiver and Chatpad , totaling about 5 thousand, come with me, and now that I have invented a DECK system~ then I have to pick it up and use it a bit. ~ Yay, DECK has to program systemX, if you don't have it, you can download it from here.
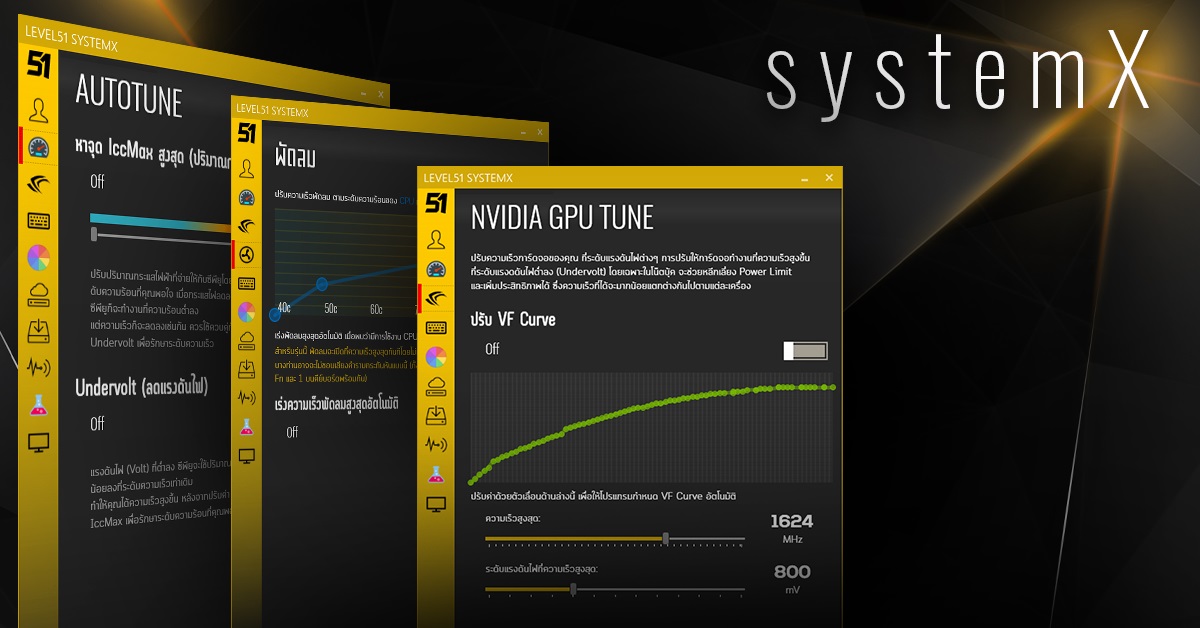
For program systemX , it is a program specifically for LEVEL51's machine, used to set up various settings and install Driver automatically, but when I started adding features and put all the programs that have been written and played together I really feel and many features Other brands are also available. So it's open for use on all devices. Not limited to LEVEL51 now, just need to register. It can be used at all.
and latest abilities Where I just picked up the old old program ideas that I had written together with the new knowledge that I have accumulated lately is DECK (that is, before that. I connect my computer to the TV at home, so I want to press Play/Pause/Adjust the volume. without having to walk to the computer page. Haha.)
What is DECK?
Explaining with a video is probably the easiest. With DECK, we can use the screen of a mobile phone or tablet to press a button on the keyboard, open a shortcut on the desktop of the page, or open a website like this.
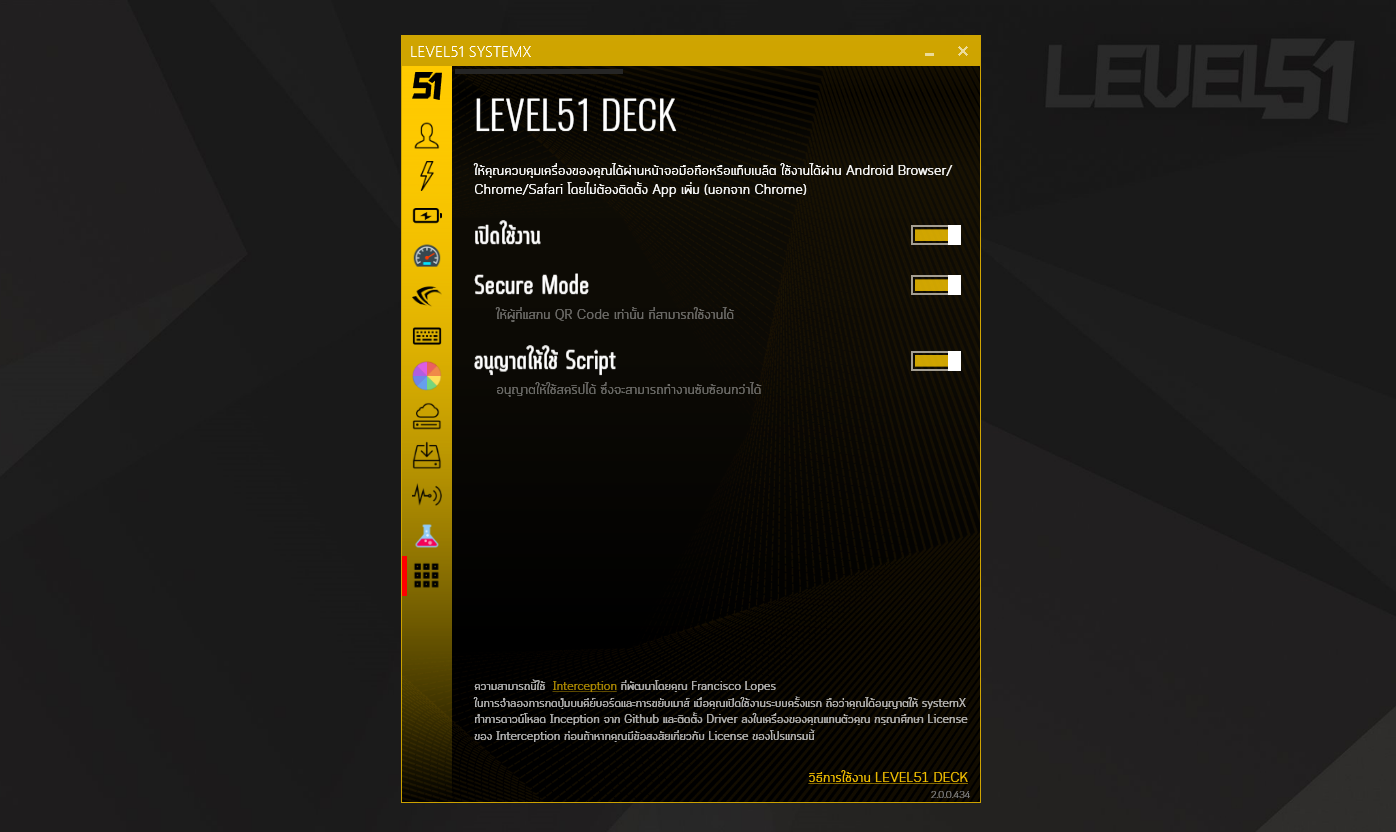
After systemX is installed, it can be activated from the LEVEL51 DECK page and there is no need to worry about security. Because the mobile phone that will be connected to view the DECK and SystemZ screen must be in the same network / connected to the same WiFi as the device that opens systemX only, it will not be a Remote Support program that allows anyone to connect to our device. (But if you want to come from outside, you can do Port Forwarding)
You can also choose whether Only those who have scanned the QR Code will be able to view it. Prevent friends from pretending to come home And it can also enable / disable Script, which is an advanced ability of DECK, and finally, if it can be used. Must press the SystemZ / Deck menu at least 1 time to open a channel in Windows Firewall to allow other machines to use DECK, so must really intend to use it. to be able to use this ability
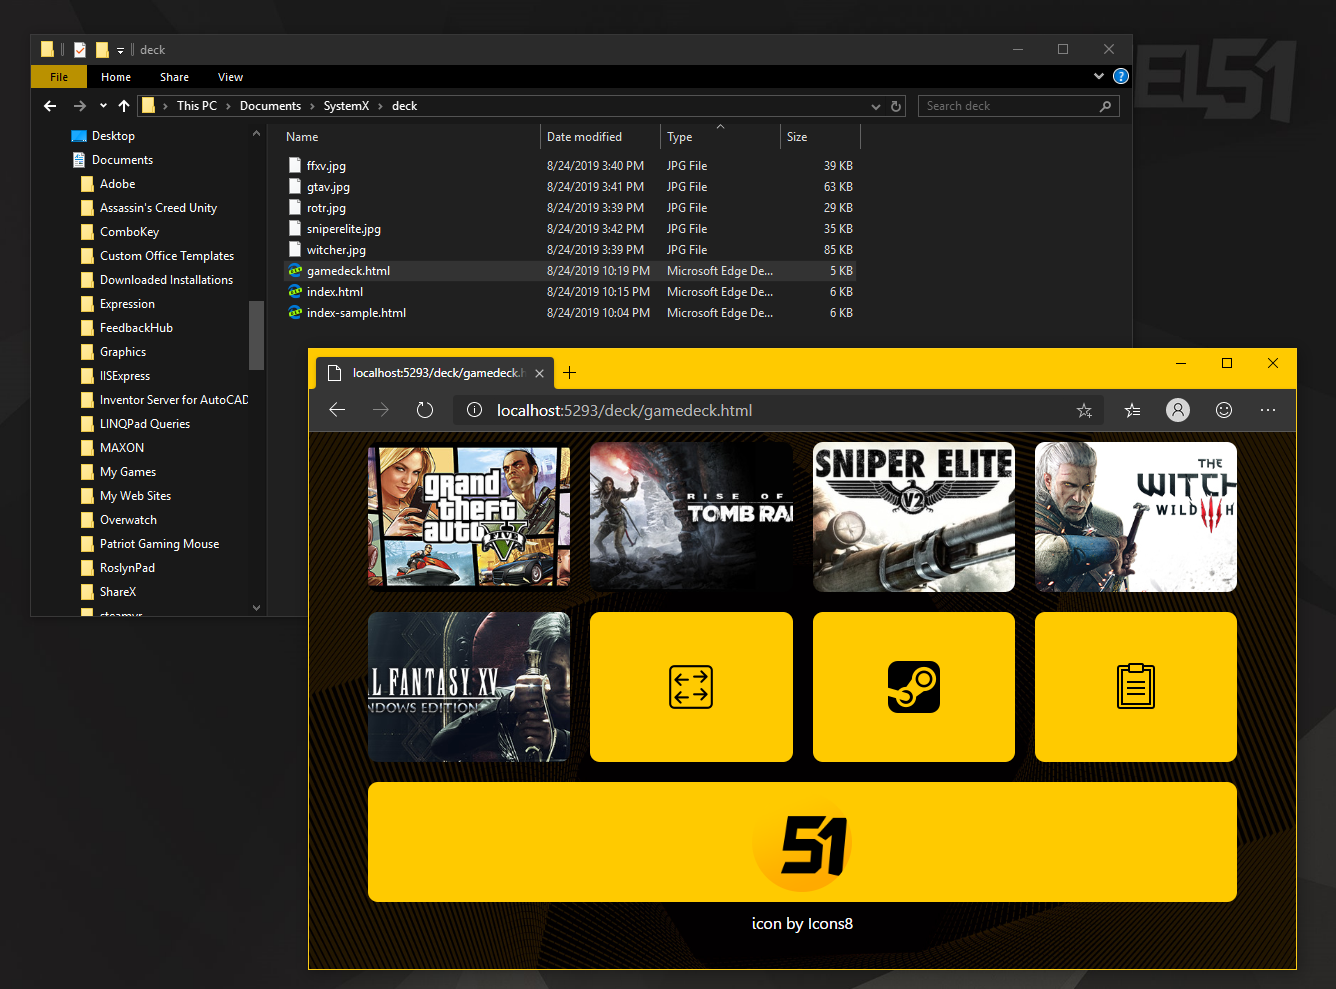
And the screen of the DECK program in the mobile phone, we can customize the look. Because it's just plain HTML, anyone who has ever written a website is fine. where you can send this file Share for anyone to use Just put the file into My Documents like I will do DECK for opening the game and press to open Steam Overlay via Tablet like this and send it to a friend to use. Just send the gamedeck.html file to your friend along with the image file used only.
HOW TO BUILD YOUR OWN DECK
Of course, the real power of DECK lies in creating your own DECK that best meets your needs, or sharing a DECK that makes sense. (Wait, you'll have to make space for sharing DECK files.)
For the sample DEC file, it is already saved in My Documents\SystemX\deck , a file named index-sample.html . You can use a file editor like Notepad to edit it, but life is better. If you are using a program that is designed specifically for web writing, we recommend Visual Studio Code .
(Actually, how to write basic HTML I have already taught a little. With another feature called SystemZ , but SystemZ's screen is written more complicated. If interested, want to know more Then go follow and read.)
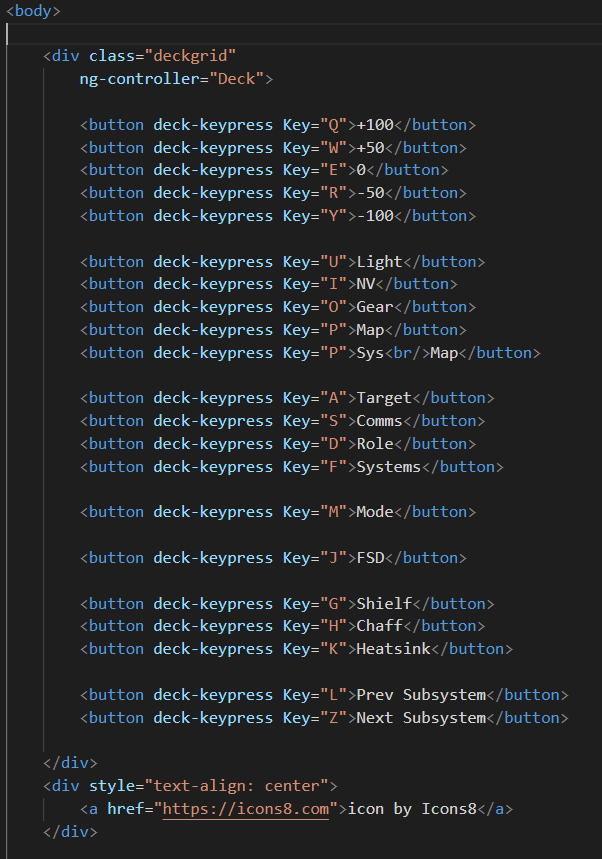
Once Visual Studio Code is installed, copy the file. index-sample.html into elite.html and start editing this file by opening Folder My Documents\SystemX\deck in VSCode first using menu File->Open Folder and then opening elite.html file.
What does Deck do?
1) Open Shortcut on Desktop
Ask why it has to be a shortcut on the Desktop, this one is for security. Because if I let go and open any .EXE, I'm afraid it's a security hole, so I decided that just a shortcut is enough, and it's probably something we use a lot, right?
The code for opening the Shortcut will look like this. Notice the word deck-shortcut="shortcut name".
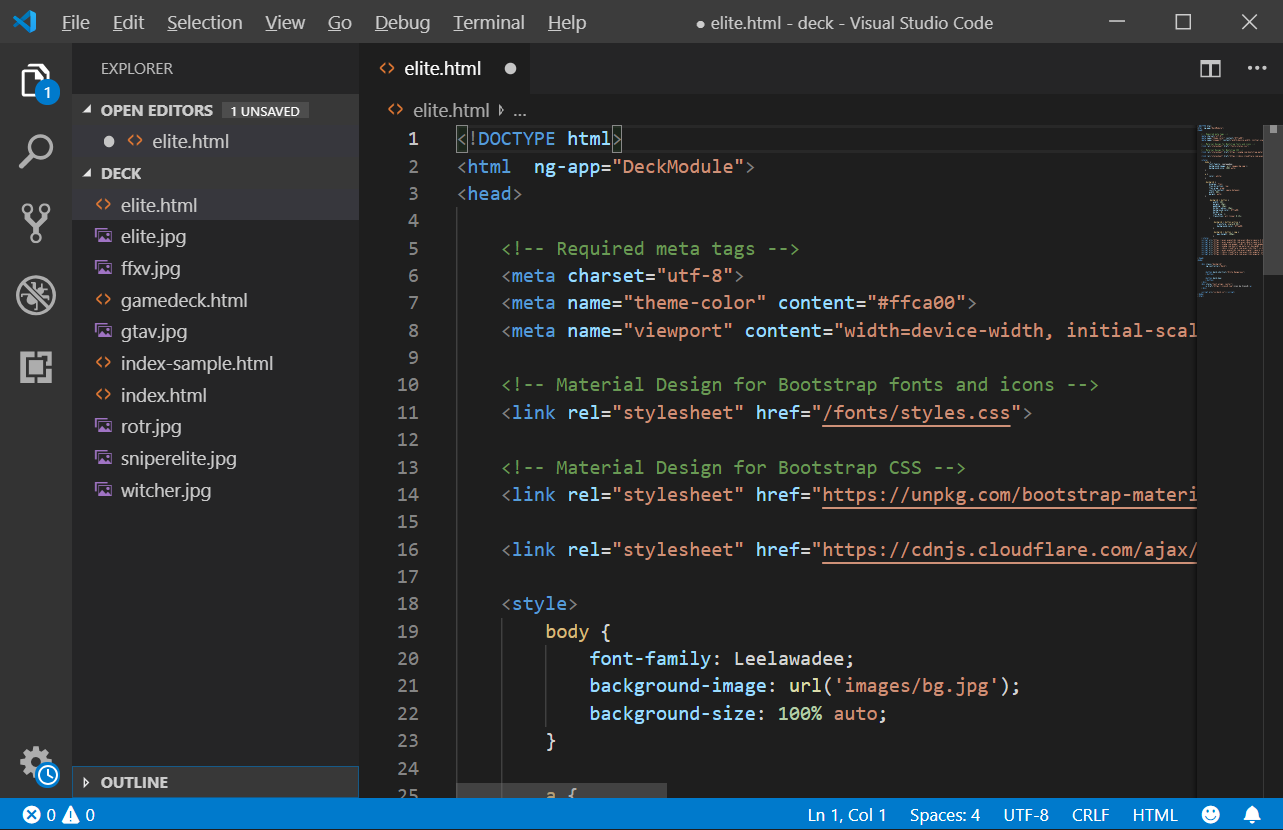
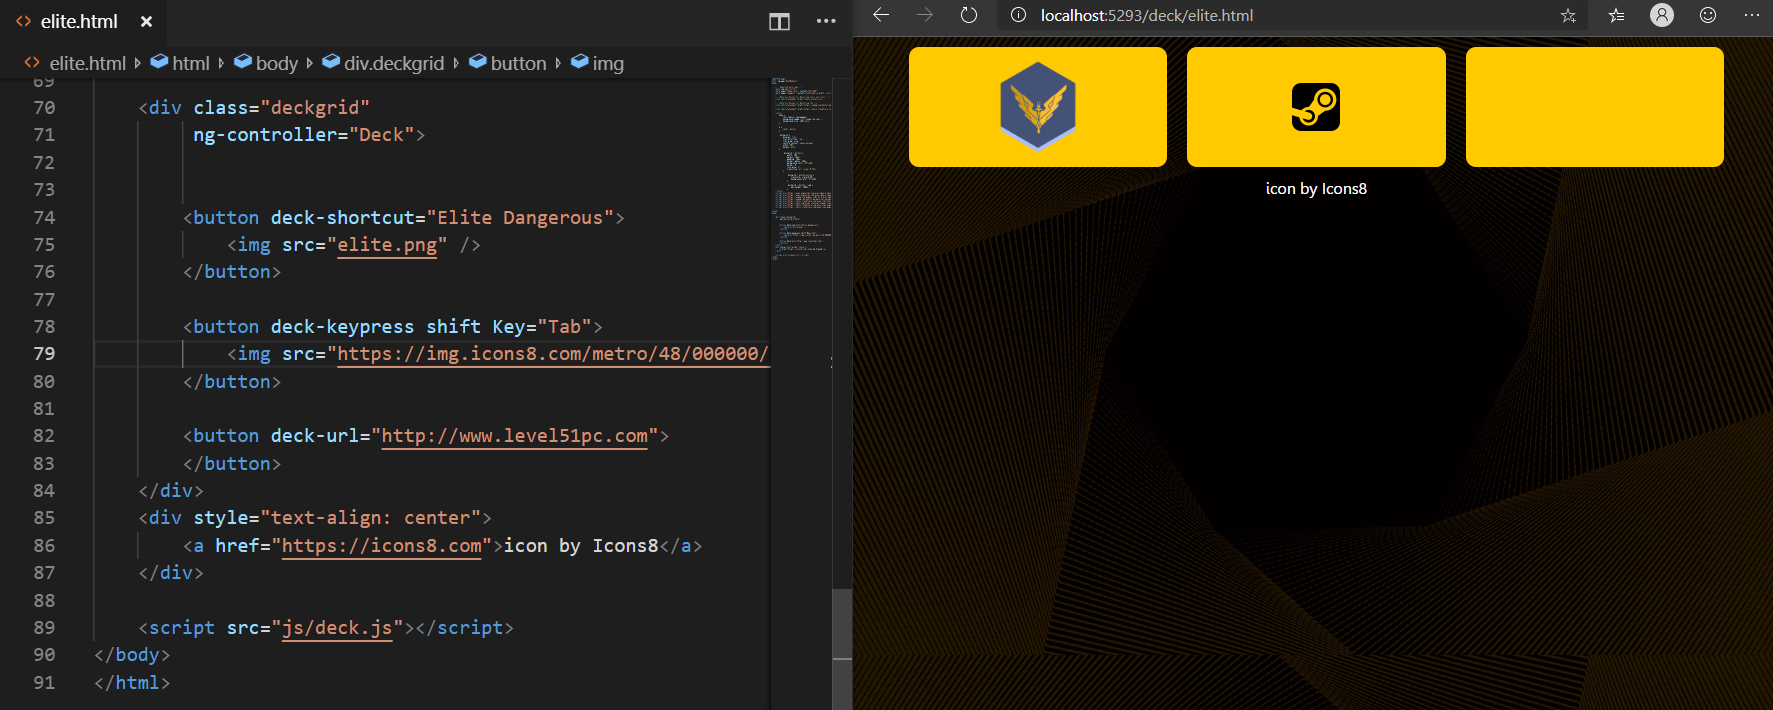
<button deck-shortcut="Elite Dangerous">
</button>
This means that the Deck will open the Elite Dangerous icon placed on the desktop when we tap this button. and for perfection We'll just have to add some icons to it. I searched and found some really cool icons in Deviant Art , so I downloaded them to use. By saving it in Folder My Documents\SystemX\deck where Visual Studio Code will understand . And we can add code <img src="..." />, type one e and VSCode will show Autocomplete for us. Just press down arrow and press Tab to get Autocomplete. no mouse click (If the one that it chooses, the first one is already correct, then press Tab)
The part that you see < and > this one is called a Tag like <button></button> like this means that we will have a button called Tag Button by a Tag with </ > like this at the end, meaning it is A tag that has something else in it, but an img tag that doesn't have </img> means that it's already the smallest tag. There is nothing else inside.
2) Press the button
code for push button It will look like this. Notice the word deck-keypress.
<button deck-keypress shift key="Tab">
</button>
This means that this button on DECK will press Shift+TAB on the keyboard to open the Steam Overlay. It will also say alt ctrl, that means If we write like this
<button deck-keypress ctrl alt shift key="F1">
</button>
will press the button CTRL+ALT+SHIFT and F1 at the same time
Allows us to use the buttons on the Deck instead of pressing the hotkey in all programs. Assuming that we will use the systemx Deck to control the scene change of OBS (OBS must right click Run As Admin to be able to capture the Hotkey without the program window being clicked), we open the OBS page and press the button on the Deck enter. into the screen like this and it's done
Or we may use it with AutoHokey for more complex commands. Write AutoHotkey and capture the Hotkey, then DECK will press the button to call AutoHotkey to work again.
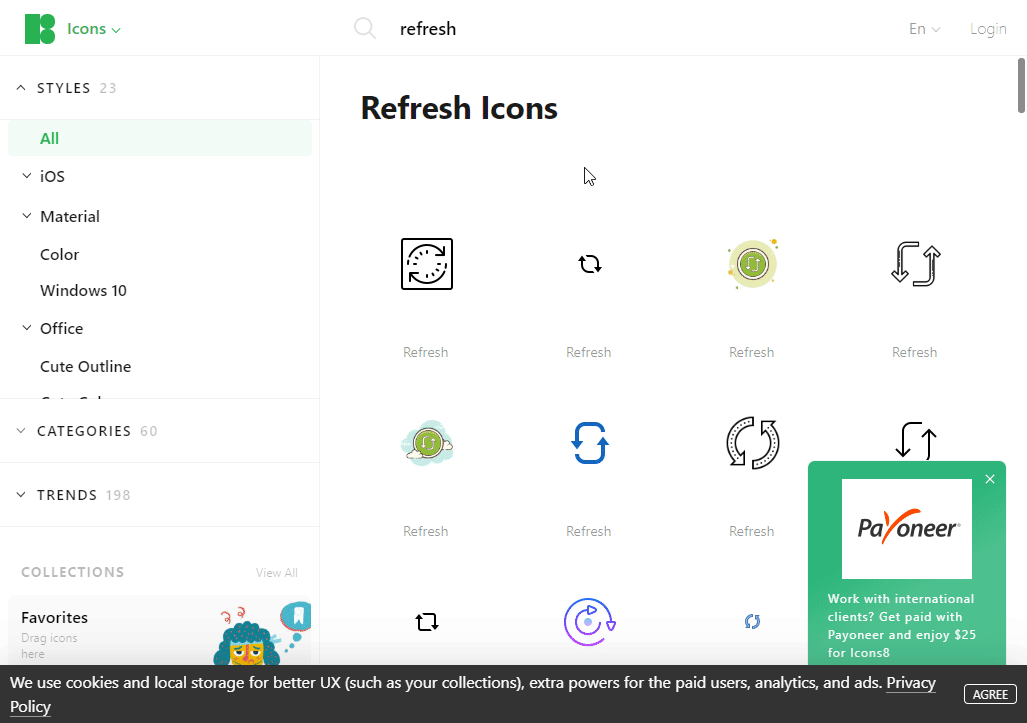
oh! and if you want beautiful icons You can get it from the icons8 website . Just go to the website and select the icon, then choose Embed HTML and paste the code. see alone Probably won't have to. :P)
3) Open URL
The code to open the URL will look like this. Nothing complicated, Windows will open the machine's standard Browser and go to the URL we wrote.
<button deck-url="https://www.level51pc.com"></button>
4) Script
Scripts are buttons that are more complicated than usual, for example to press multiple keys in succession. Macro program For now, let's split this into another separate post.
How to add buttons and test buttons
For the sample file I made for you Will be displayed as a grid or mood similar to a grid. There are buttons arranged in a row, with a maximum of 5 buttons in one row, and if there are fewer than 5 buttons, the existing buttons will expand to fit the available space. that row automatically So if you want to add a button Just copy the existing button out. and put it down
Like now, if we try to put the button down and follow me will get a button like this
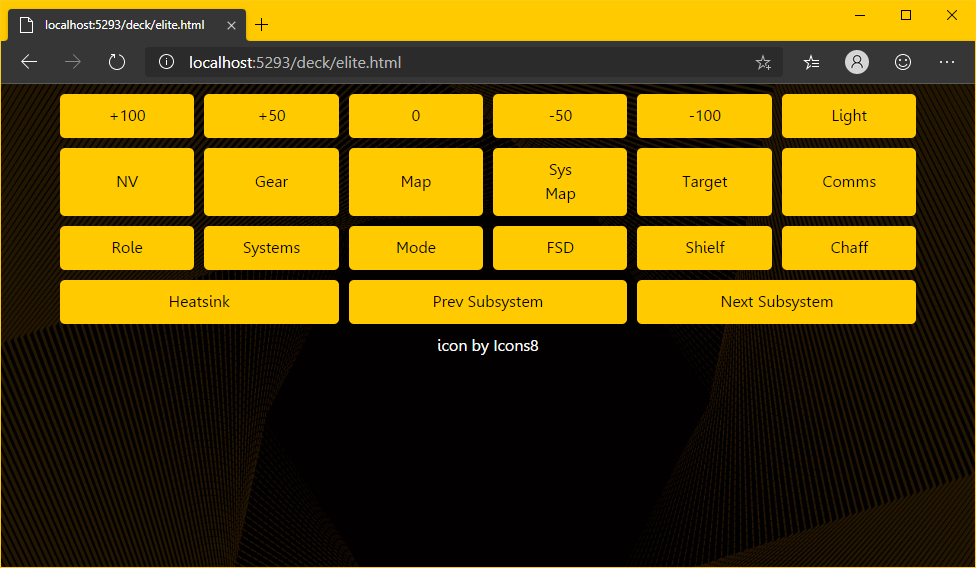
for button testing You can use it to connect to DECK with your mobile phone, or you can open a browser on your device. which will be more convenient After DECK is enabled, just open your browser and type this URL.
http://localhost:5293/deck/ [Deck filename] .html
For example, we are currently editing the elite.html file, if we want to test it, type http://localhost:5293/deck/elite.html into the Address field, etc. The buttons on this page can actually work. Try clicking on it from the browser page.
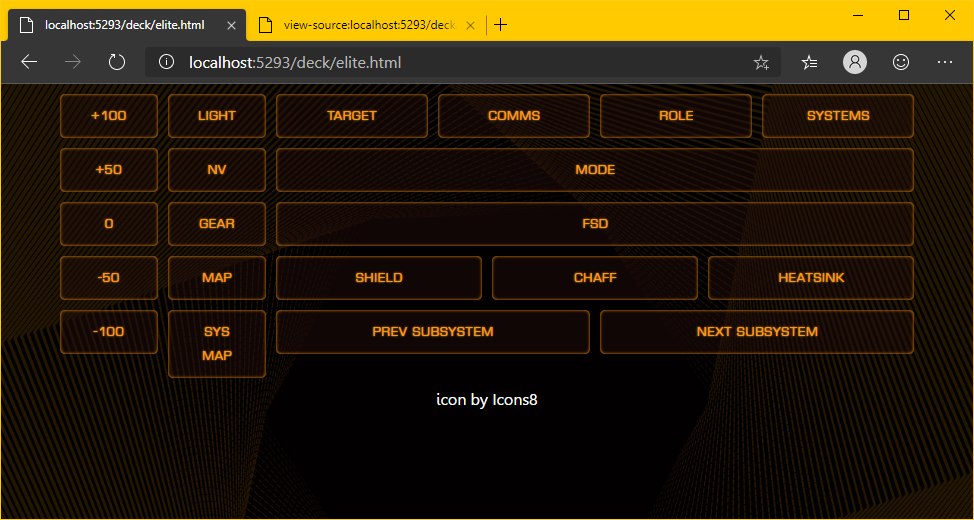
Example: Deck screen for Elite Dangerous and basic HTML+CSS.
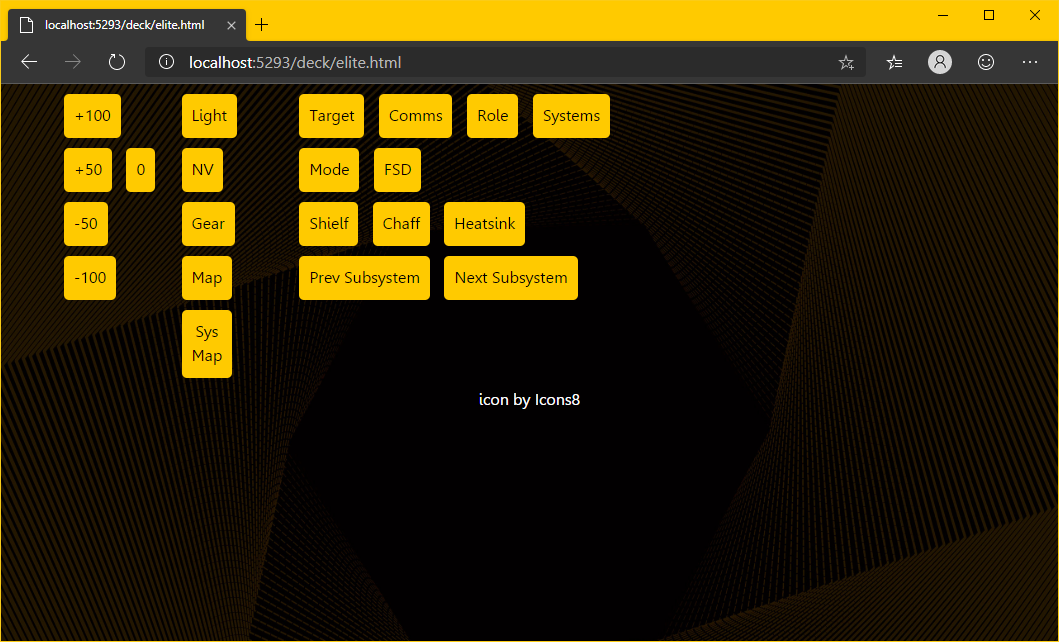
This time for Elite Dangerous, we will have to make it into the theme a bit. We have to look at that. What buttons do we need to use often? And it's good to take your hand out of the joystick and press it (I play with the joystick), so I can conclude that it must be a button for exploration mode, landing, something like this, because if we're driving a launcher. Put the buttons that will be used when firing on the joystick in the first place.
So I roughly thought that I would make a screen like this. Which button has to be pressed at random times? Let's make it a little bigger like this.
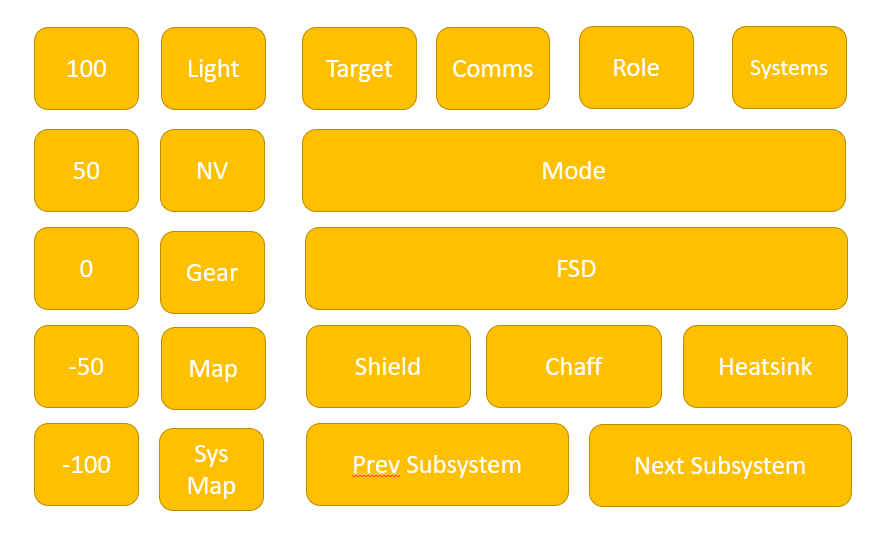
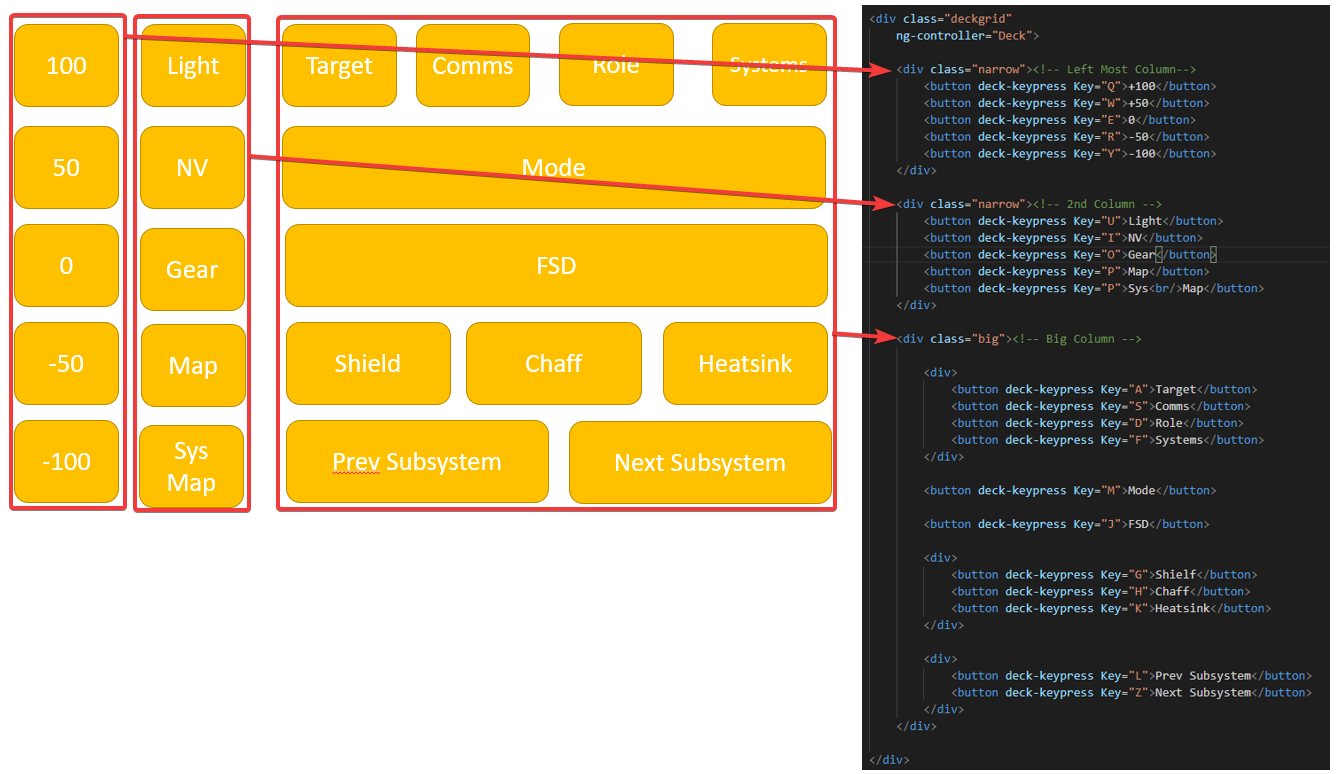
First of all, we take the buttons we want. Put it all down first. To be organized, separated by groups like this, by looking from the vertical direction, notice that since we don't need to use anything as a reference to what button should be, use the QWERTY button ... go away this mood
but when on the screen The buttons will line up. It hasn't come out the way we want it to be. We'll just have to group it up a bit.
There are several ways to do this. But let me choose a method that I like. That is, I will put it in the Div tag first, looking at the screen with 3 columns, which one is in the same group, let it be the same Div and which one is on the same line. then nested into the div again
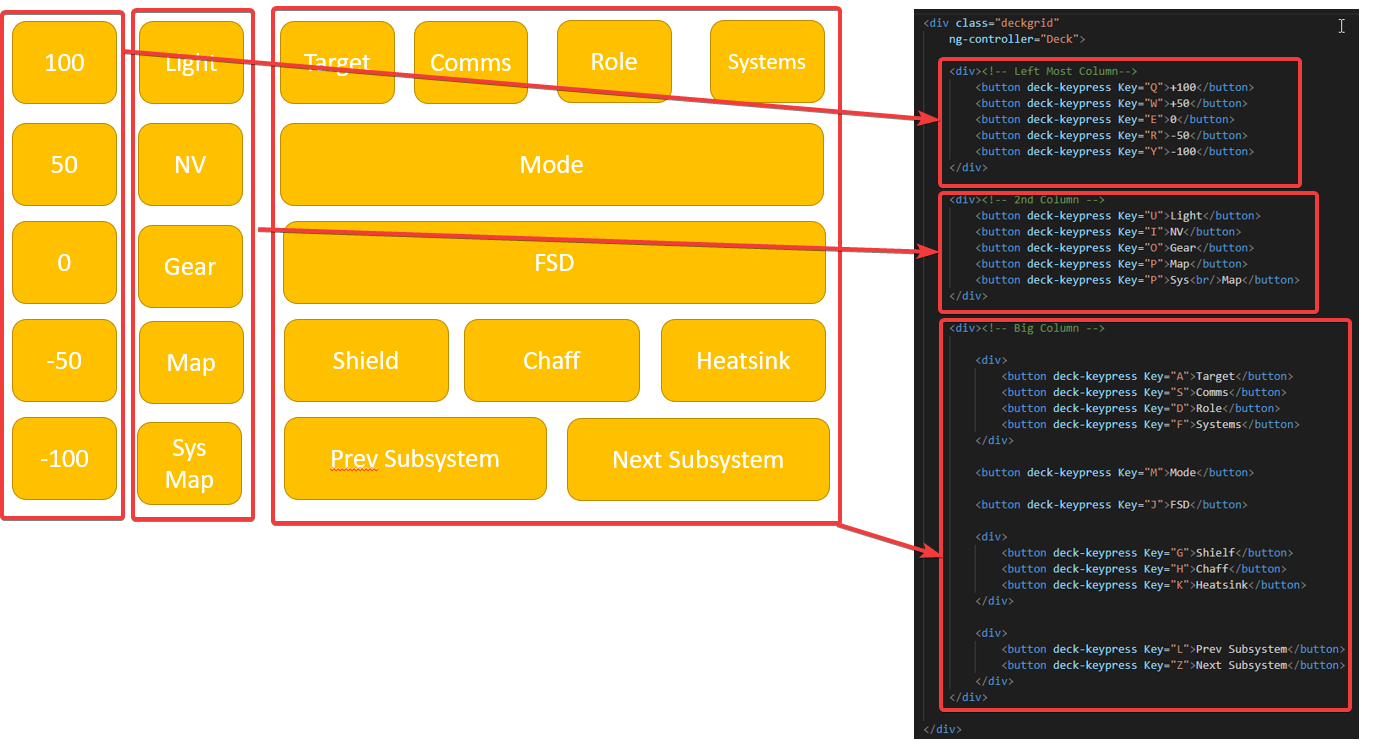
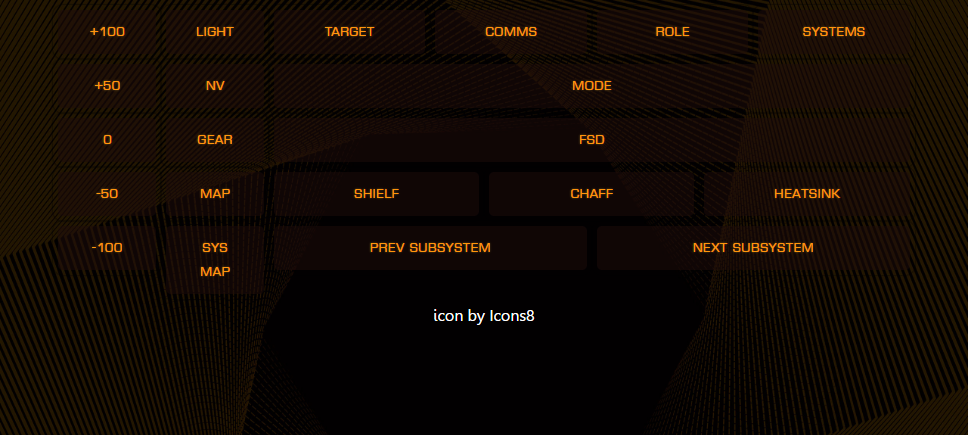
But as soon as I corrected this The screen will be broken. But the outline come out right
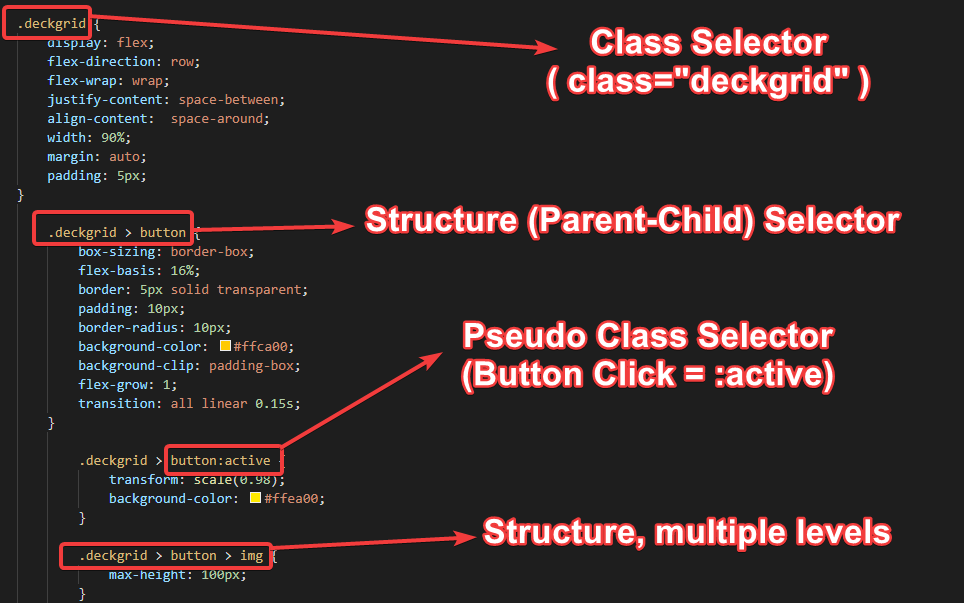
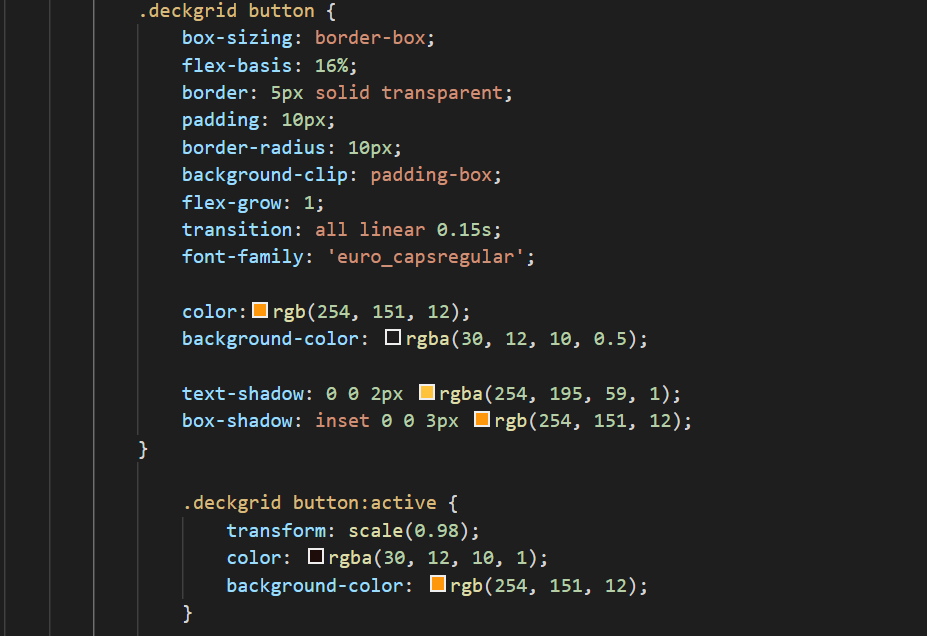
The reason why the button became the same square That's because the Style that I have defined is written that only the button under Only class="deckgrid" will have a yellow background. Style is defined here.
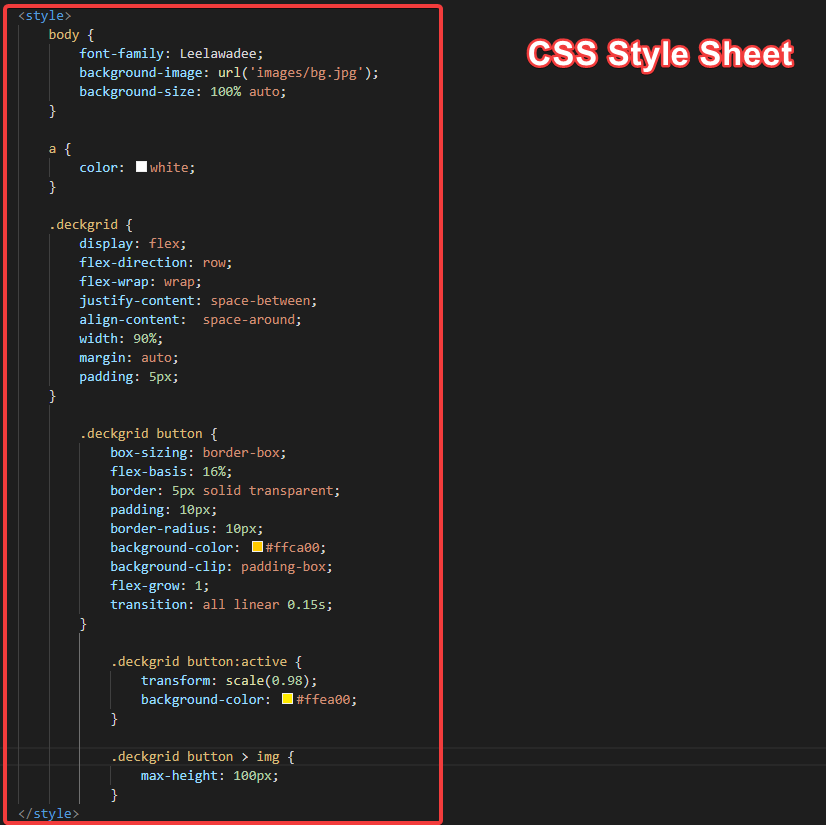
Actually putting CSS in an HTML file like this should be very hit. We should separate the files better. Notice that there is a .css file linked to this HTML file too. will be written like this
<link rel="stylesheet" href="https://cdnjs.cloudflare.com/ajax/libs/Chart.js/2.8.0/Chart.min.css" />
but for the sake of confusion We'll put it together like this.
Now let's look at the Style, you can see that in the Style that I wrote for you to see. There are many designs too.
- .deckgrid (with a dot in front) means this style is used for tag divs that have class="deckgrid" .
- .deckgrid > button means the tag button is only under the div class="deckgrid" . If you go back and look at the code, you will see that at first the button was yellow because the button was immediately under the div, but now it has a div. The button is covered, so it is no longer in use.
- button:active means tag button, but it's when the button is pressed. You can see that the yellow color changes a bit when you press it.
- .deckgrid > button > img This subspecies the img tag in the tag button and the tag button must be located under the tag div that has class="deckgrid" .
Now if we are going to fix the button It's back to the way it was We can do it in two ways.
- Remove the .deckgrid > preceding to say that all the buttons on this page will be removed. is a yellow button or
- You can also change it from .deckgrid > button to .deckgrid button (remove > remove). This means that the tag button is inside the .deckgrid, but it doesn't have to be underneath it contiguously. Something can come in the middle first.
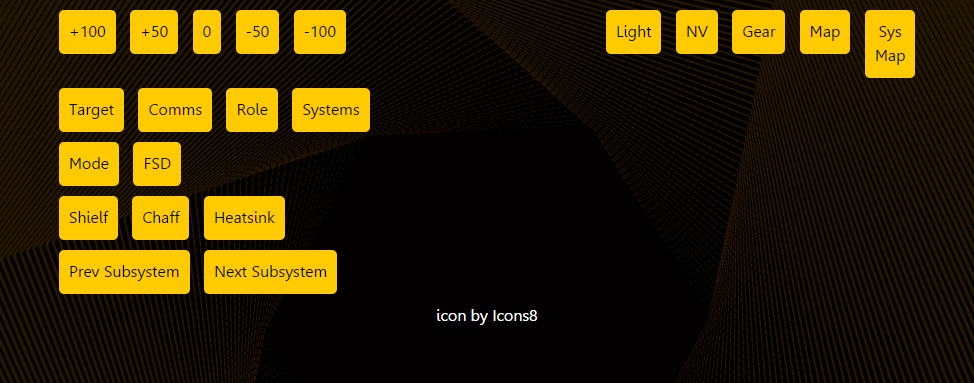
I like that it has a structure because otherwise the screen is very messy. I'm confused. I will use the second method, Remove > Remove. The button will be yellow as usual. But the screen still won't work as we want.
Continue aligning each other with CSS.
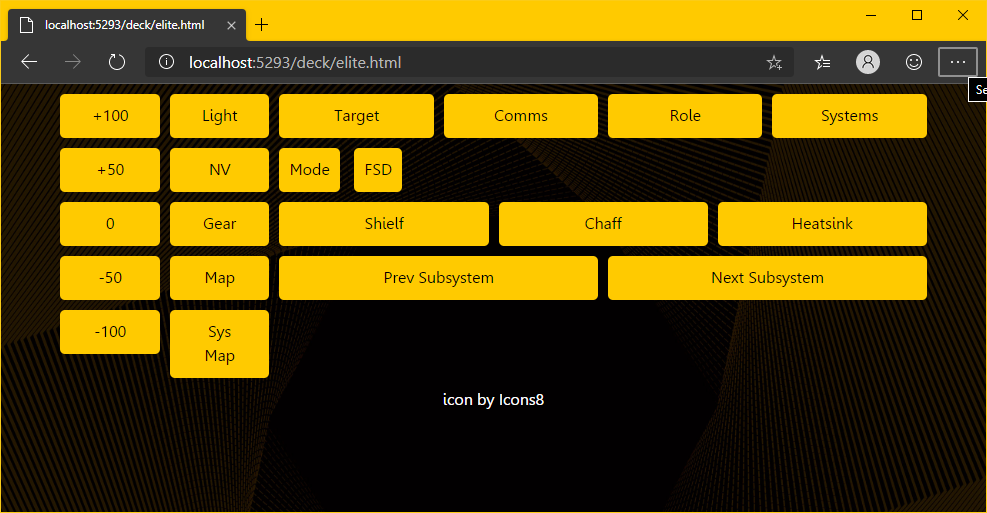
Now that we know how to choose a struct in CSS and how to use class="xxx", we've put it together. is from within our screen We will have one wide column and two narrow columns. We'll call narrow columns narrow and wide columns big by adding class="narrow" and class="big" .
But just adding a class to it, it's useless. It looks the same. We need to add a Style to it too. Like this, with .narrow we say flex-basis: 12.5% means let the base width of the item be 12.5%, but .big we say let it flex. -grow: 1 means that it can expand to fill the entire area.
        .deckgrid > .narrow {
            flex-basis: 12.5%
        }

        .deckgrid > .big {
            flex-grow: 1;
        }
But the buttons inside, we still don't like it much. We want the row of Narrow keys to be fully expanded, right? We added the following. to make the button expand to 100% by column width
.deckgrid > .narrow > button
{
     width: 100%;
}
As for the rows of the big Colman, we wanted the buttons to be spread across the width as well. We will also need to specify that the div under .big is also a Flex Container so that it automatically distributes the button width like this.
        .deckgrid > .big > div {
            display: flex;
        }
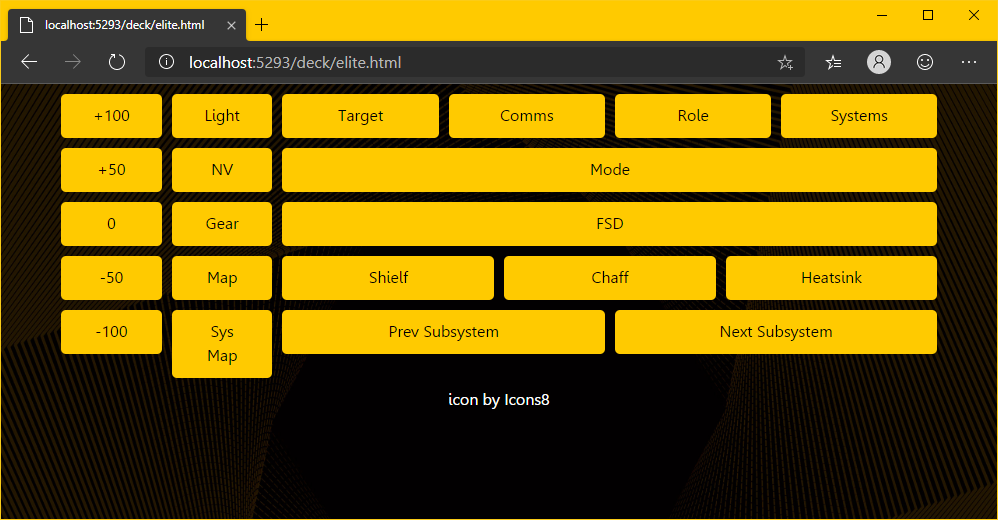
We will get the result, almost the same as we want, just missing FSD and Jump, not the button size we want. because these two buttons It's not under the div like other buttons.
What should I do now? Just use CSS as usual. We give buttons. It renders it as a block, where it renders full width and pushes whatever comes after it down. Unlike its usual inline type, which can have other people append it.
        .deckgrid > .big > button {
            display: block;
            width: 100%;
        }
By these systems in CCS we call FlexBox (Flexible Box), try to follow and read more here. If you want to arrange the buttons to be more like It can be sorted in many different ways by name.
Beautify your screen
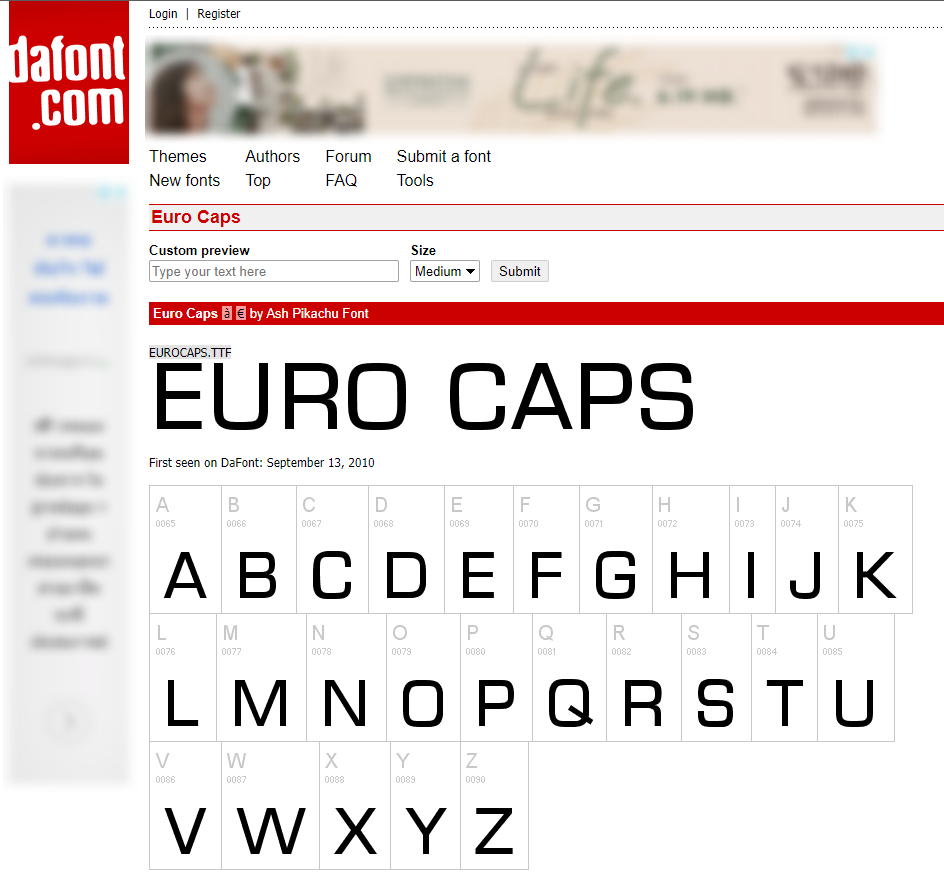
Let's get started, we'll fix the font a bit. The fonts used in Elite Dangerous are mostly Eurocaps. We can download it from the dafont website, this way, https://www.dafont.com/euro-caps.font . Once loaded, it can be installed on your device by Double Clicking.
But if we just take this font to install in our machine mobile display time The font won't go along with it. We will need to convert this font. for use on the web first by going to the web https://www.fontsquirrel.com/tools/webfont-generator and throw the resulting .TTF file into it.
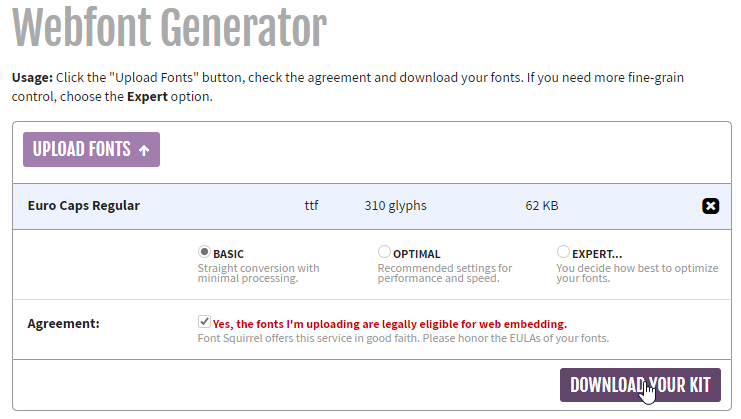
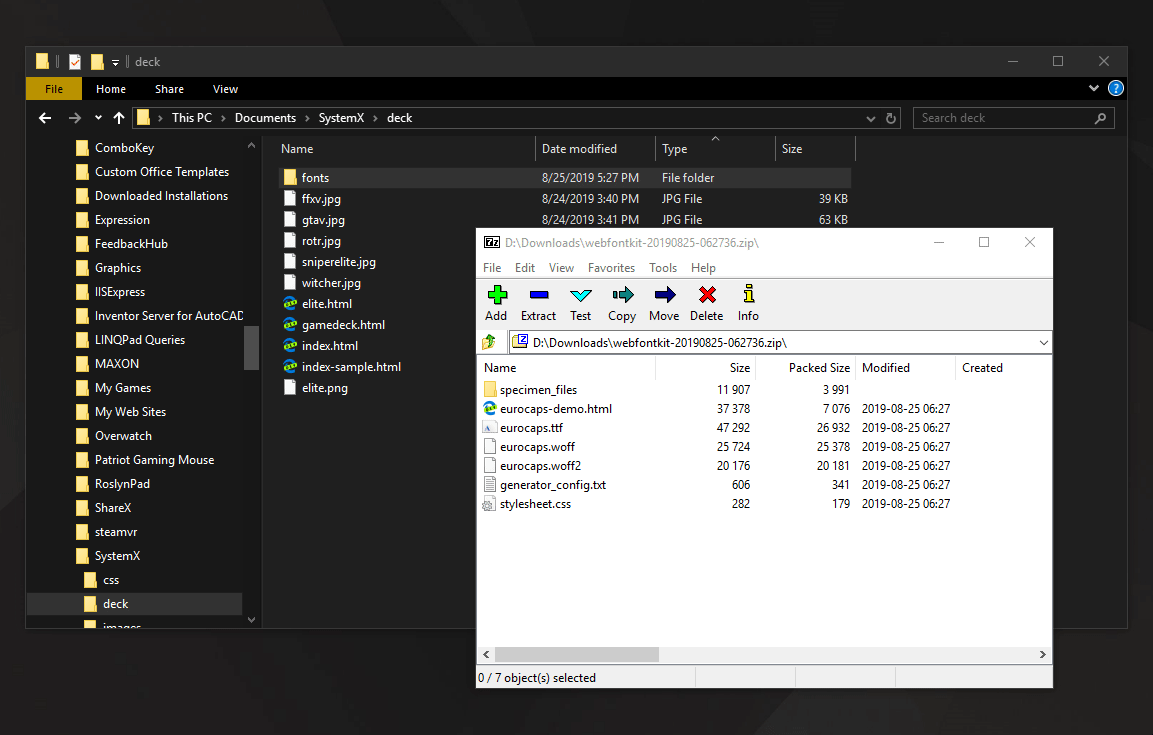
Then choose "Basic", do not have to go to Process, and choose "Yes" as well (ps. Font EUROCAPS is free as mentioned in the dafont) and download it right away. Then open the Zip file (with 7-zip! If you're still using WinRAR and haven't paid for it, you can download 7-Zip and use it) and put it in the fonts folder like this.
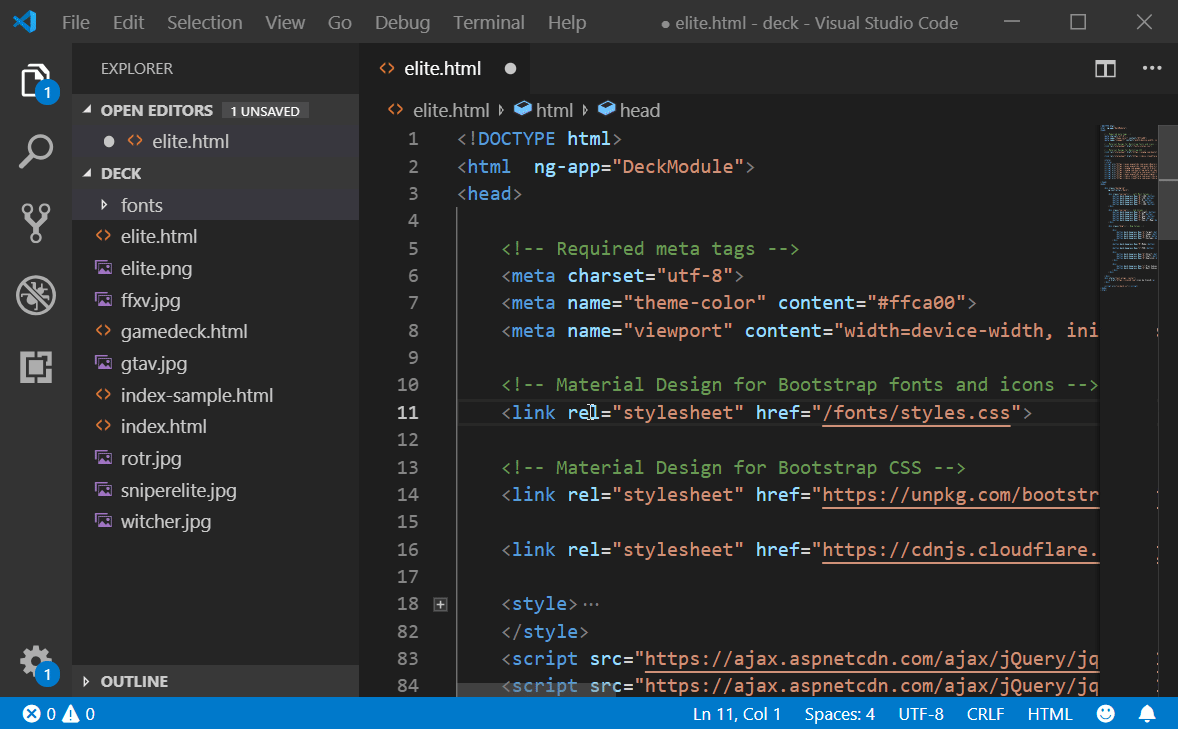
Then we bring EUROCAPS to use by linking the .css file with the code (note: in the example it is written wrong, there must be no / in front of the fonts/)
<link rel="stylesheet" href="fonts/eurocaps.css" />
Then change the button's font by adding the font-family: 'eurocaps_regular' to it (which we know we have to write like this when viewing the eurocaps.css file we obtained.
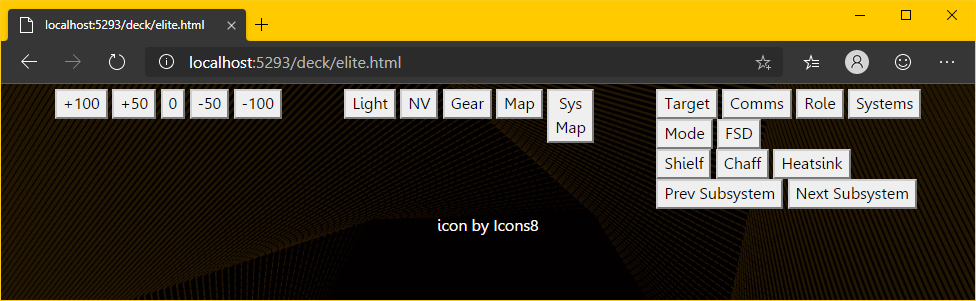
Yay, I got a button similar to Elite Dangerous except SYS MAP. I'll fix it again.
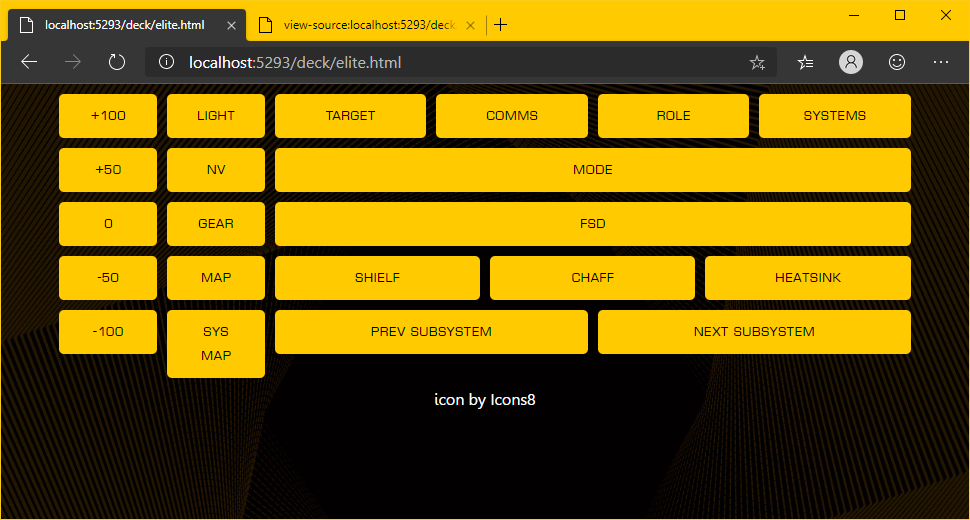
Next, the UI of Elite Dangerous has to be a little orange. We went to suck the color from the Elite Dangerous web page with a tool that every web writer should have, namely ShareX. It came out in a color like this (Seems to be harder than before >.<)
So you have to add shadow characters. with a little edge shadow to get this effect (finally, this page has fixed the word SHIELF...)
In summary the code added is something like this (Color, background-color, text-shadow and box-shadow, and you need to change it to active, otherwise the color will be distorted when pressed.
As for the sysmap, I cheated a bit by putting the Style hard code on the line height. Got good results as well, came out looking beautiful.
           <button deck-keypress Key="P"
                   style="line-height: 75%">System<br/>Map</button>
Then I tried it on my mobile phone (Huawei MediaPad M3) and enlarged the letters. with a bit more button size Satisfactory results!~ The rest is just sit, bind the button and find time to play the game. That's all~~~!!!
The rest is up to you!
Well, if you have any idea what DECK should do, or if you have a cool DECK file, don't forget to send it to us at [email protected] And we will put them on this page~ The part that I plan to do more is
- The system allows to upload DECK to share. Choose to search for DECK to use.
- Automatically switch DECK files according to program/game. that were opening at that time
But now I have to wait to test the system a bit.